Growing baby carrots indoors is a rewarding endeavor that allows you to enjoy fresh, sweet carrots year-round, regardless of outdoor weather conditions. With the right techniques and attention to detail, even novice gardeners can achieve impressive yields in compact indoor spaces.
What Are Baby Carrots?
Understanding what baby carrots actually are is essential before beginning your indoor growing journey, as there’s often confusion about terminology in the commercial market.
True Baby Carrots vs. “Baby-Cut” Carrots:
The baby carrots commonly found in grocery stores are not actually young carrots. These uniform, torpedo-shaped vegetables are “baby-cut” carrots—full-sized carrots that have been mechanically cut, peeled, and polished into small pieces. They’re a product of food processing, not early harvesting.
True baby carrots, which is what you’ll be growing indoors, are genuine immature carrots harvested when they’re young and small, typically at 50-70 days after planting. These are whole carrots picked before reaching full maturity, complete with their delicate skin, natural taper, and often with tender greens still attached.
Characteristics of True Baby Carrots:
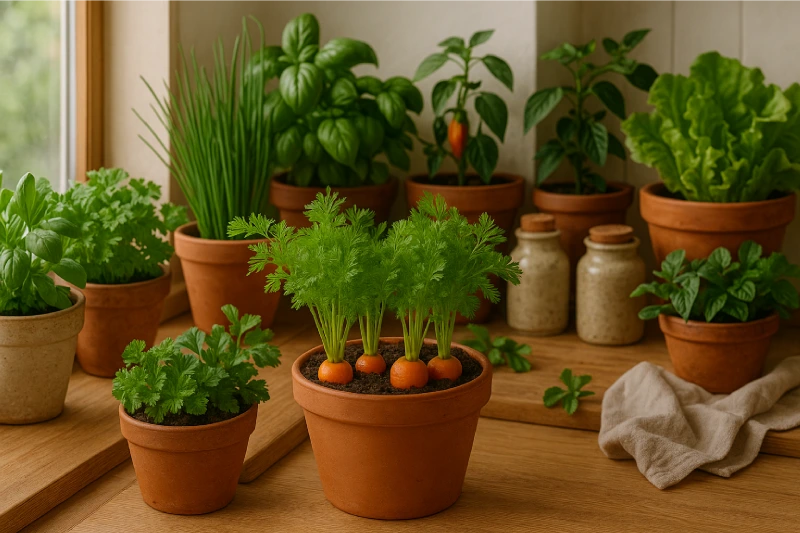
True baby carrots measure 3-4 inches in length and approximately 1/2 to 3/4 inch in diameter at the crown. They possess a sweeter, more delicate flavor than mature carrots because they haven’t yet developed the woodiness that comes with age. The texture is exceptionally crisp and tender, and the thin skin is so delicate it doesn’t require peeling.
These young carrots contain higher moisture content and more natural sugars relative to their fiber content, making them prized by chefs and home cooks for their superior taste and texture. They’re ideal for eating raw, roasting whole, or showcasing in dishes where their tender nature and sweet flavor can shine.
Varieties Suited for Baby Harvest:
While technically any carrot variety can be harvested as a “baby” carrot, certain cultivars are specifically bred for small spaces and early harvest. These varieties naturally produce shorter, rounder roots that reach ideal baby size quickly without sacrificing flavor. Popular baby carrot varieties include:
- ‘Paris Market’: Nearly round roots, 1-2 inches diameter, extremely sweet
- ‘Thumbelina’: Golf ball-sized, perfect for containers
- ‘Little Finger’: Slender 3-4 inch roots, very sweet
- ‘Babette’: True baby variety, uniform size, excellent flavor
- ‘Romeo’: Compact tops, sweet 3-4 inch roots
- ‘Short ‘n Sweet’: Blocky 4-inch roots, tolerant of heavy soils
Why Grow Baby Carrots Indoors?:
Baby carrots are ideally suited to indoor cultivation for several reasons. Their compact size requires less depth than full-sized varieties, making them perfect for container growing. They reach harvest maturity faster than standard carrots, providing quicker rewards for your efforts. The controlled indoor environment protects them from common outdoor carrot pests like carrot rust fly and eliminates weather-related challenges.
Additionally, baby carrots’ shorter growing season means you can achieve multiple successive harvests throughout the year, ensuring a constant supply of fresh carrots regardless of outdoor seasons.
Growing from Seed
Baby carrots must be grown from seed, as they are essentially standard carrot varieties harvested at an immature stage. Select varieties specifically bred for container growing and shorter root development, such as ‘Paris Market’, ‘Thumbelina’, ‘Little Finger’, or ‘Babette’. These varieties typically mature in 50-70 days and develop roots 3-4 inches long.
Seed Preparation and Sowing:
Carrot seeds are notoriously slow to germinate, taking 14-21 days under optimal conditions. To improve germination rates, soak seeds in room-temperature water for 2-3 hours before planting. This softens the seed coat and jumpstarts the germination process.
Sow seeds directly into their final container, as carrots develop a sensitive taproot that resents transplanting. Plant seeds 1/4 inch deep, spacing them about 1/2 inch apart in rows 2 inches apart. For container gardens, you can broadcast seeds more liberally and thin later. Carrot seeds require consistent moisture and darkness to germinate, so cover the container with a humidity dome, plastic wrap, or damp burlap until sprouts emerge.
Maintain soil temperature between 65-75°F during germination. Once seedlings emerge with their first true leaves (the second set of leaves), thin them to 1-2 inches apart. This spacing is crucial for baby carrots, as overcrowding results in twisted, forked, or stunted roots. Use scissors to snip unwanted seedlings at soil level rather than pulling them, which can disturb neighboring roots.
Containers and Repotting
The container choice is critical for carrot success. Baby carrots need containers at least 8-12 inches deep to accommodate root development, though deeper is always better. Width matters too—a container 12-16 inches in diameter can accommodate 15-20 baby carrots.
Container Requirements:
Choose containers with adequate drainage holes to prevent waterlogging, which causes root rot and forked carrots. Materials like plastic, ceramic, or fabric grow bags all work well. Avoid metal containers, which can heat up and stress plants. Self-watering containers are particularly effective for carrots, as they maintain consistent moisture levels.
The No-Repotting Rule:
Unlike many vegetables, carrots should never be repotted after germination. Their taproot is extremely sensitive to disturbance, and any transplanting will result in deformed, forked, or stunted roots. This is why direct seeding into the final container is absolutely essential. Plan your container size accordingly before planting.
Soil Requirements
Soil composition directly impacts carrot shape, flavor, and growth rate. Baby carrots demand loose, well-draining, stone-free growing medium.
Ideal Soil Mix:
Create a specialized blend using:
- 40% high-quality potting soil or coconut coir
- 30% perlite or vermiculite for drainage
- 20% compost (fully decomposed)
- 10% sand (builder’s sand, not beach sand)
This mixture ensures roots can push through easily without encountering resistance that causes forking or splitting. The texture should be fine and crumbly, similar to coffee grounds. Sift out any lumps, stones, or wood chips larger than 1/4 inch.
pH and Nutrients:
Maintain soil pH between 6.0-6.8. Carrots are light feeders compared to fruiting vegetables, but they require adequate phosphorus and potassium for root development. Avoid fresh manure or nitrogen-heavy amendments, which cause excessive foliage growth, hairy roots, and forked carrots.
Before planting, mix in a balanced organic fertilizer (5-5-5 or 5-10-10 ratio) according to package directions. The soil should be fertile but not overly rich.
Watering Practices
Consistent moisture is the single most important factor in growing perfect baby carrots. Irregular watering causes cracking, splitting, and woody texture.
Watering Schedule:
Keep soil evenly moist but never waterlogged. The top inch of soil should feel slightly damp to the touch. During germination, water lightly once or twice daily to keep the surface from drying out. After seedlings establish, water deeply 2-3 times per week, or more frequently in warm conditions.
Techniques:
Use a watering can with a fine rose attachment or bottom-watering methods to avoid disturbing seeds and young seedlings. Drip irrigation or self-watering containers provide the most consistent moisture levels. Always water at the soil level rather than overhead to prevent fungal diseases.
Monitor containers closely, as indoor environments can dry soil faster than expected. Insert your finger 2 inches into the soil—if it feels dry at that depth, water thoroughly until it drains from the bottom. Empty drainage trays after 30 minutes to prevent roots from sitting in standing water.
Water Quality:
Use room-temperature water, as cold water can shock roots and slow growth. If using tap water, let it sit for 24 hours to allow chlorine to dissipate, or use filtered water. Carrots are sensitive to salt buildup, so flush containers monthly with plain water to leach accumulated salts.
Light Requirements
Carrots are full-sun vegetables requiring abundant light for healthy growth and sweetness development.
Natural Light:
Position containers near south-facing windows where plants receive 6-8 hours of direct sunlight daily. Rotate containers 180 degrees every few days to ensure even growth and prevent plants from leaning toward the light source. East or west-facing windows can work but may produce slower growth and smaller roots.
Artificial Lighting:
For optimal indoor results, especially in northern climates or during winter, supplement or replace natural light with grow lights. LED full-spectrum grow lights are most efficient and produce less heat than fluorescent or HID options.
Position lights 6-12 inches above the foliage, adjusting height as plants grow. Provide 12-16 hours of light daily using a timer for consistency. Carrots don’t require the intense lighting needed by tomatoes or peppers, but inadequate light produces spindly foliage and underdeveloped roots.
Light Spectrum:
During the vegetative growth phase (first 4-5 weeks), emphasize blue spectrum light (5000-6500K) for strong foliage development. As plants mature and focus energy on root production, a full-spectrum or slightly warmer light (3500-5000K) supports optimal root growth and sugar development.
Feeding and Fertilization
Baby carrots require modest but consistent nutrition throughout their growth cycle.
Fertilization Schedule:
If you’ve incorporated slow-release fertilizer into the soil at planting, no additional feeding may be necessary for the first 4 weeks. After this initial period, begin fertilizing every 2-3 weeks with a diluted liquid fertilizer.
Fertilizer Selection:
Choose fertilizers with higher phosphorus and potassium relative to nitrogen—ratios like 5-10-10 or 4-10-10 work well. High nitrogen promotes excessive leaf growth at the expense of root development and can cause hairy, forked roots.
Dilute liquid fertilizers to half the recommended strength to avoid burning roots. Organic options like fish emulsion, seaweed extract, or compost tea provide gentle nutrition and beneficial microorganisms. Apply fertilizer to moist soil, never to dry soil, which can cause root burn.
Micronutrients:
Carrots benefit from adequate calcium, magnesium, and boron. Occasional applications of Epsom salt solution (1 tablespoon per gallon of water) provides magnesium and sulfur. Boron deficiency causes cracked roots, so ensure your fertilizer includes trace minerals or add a tiny amount of borax solution (1/4 teaspoon per 4 gallons of water) once mid-season.
Stop fertilizing 2 weeks before planned harvest to allow plants to focus energy on root maturation and sugar development.
Ideal Growing Conditions
Creating the perfect environment ensures maximum yield and quality.
Temperature:
Baby carrots thrive in cool to moderate temperatures. Ideal growing conditions include:
- Daytime temperatures: 60-70°F
- Nighttime temperatures: 55-65°F
Carrots tolerate cooler conditions better than heat. Temperatures consistently above 75°F cause bitter flavor, woody texture, and increased bolting risk. Temperatures below 50°F slow growth significantly but won’t harm established plants. This cool-season preference makes carrots excellent for growing during fall and winter indoors.
Humidity:
Maintain relative humidity between 50-70%. Indoor heating systems can drop humidity levels, causing stress and slower growth. Increase humidity by grouping plants together, using pebble trays filled with water beneath containers, or running a humidifier nearby.
Good air movement prevents fungal diseases and strengthens stems. Use a small oscillating fan on low speed to provide gentle, constant air circulation. Position the fan to create indirect airflow rather than blasting plants directly.
Companion Planting:
In larger containers, intercrop baby carrots with shallow-rooted herbs like chives, parsley, or cilantro. These companions deter carrot rust flies (less common indoors but possible) and maximize space without competing for resources.
Pest and Disease Management:
Indoor growing significantly reduces pest and disease pressure. Watch for aphids, spider mites, and fungus gnats. Address aphids with insecticidal soap spray, spider mites with increased humidity and neem oil, and fungus gnats by allowing the soil surface to dry between waterings and using yellow sticky traps.
Prevent damping-off disease by maintaining good air circulation, avoiding overwatering, and using sterile growing medium. Powdery mildew occasionally affects carrot foliage in humid conditions—treat with baking soda solution (1 tablespoon per gallon of water plus a few drops of dish soap).
Harvesting Baby Carrots
The reward for your patience arrives 50-70 days after planting, depending on variety and growing conditions.
Determining Harvest Readiness:
Baby carrots are harvested when roots reach 3-4 inches long and approximately 1/2 to 3/4 inch in diameter. Unlike mature carrots, baby carrots should be harvested while still young and tender for optimal sweetness and crisp texture.
Check progress by gently brushing away soil from around the crown (top of the root) to inspect size. The shoulder of the carrot should be visible at the soil line or just below. For true baby carrots, harvest when the crown diameter reaches 1/2 to 1 inch across.
Harvesting Technique:
Water the soil thoroughly several hours before harvest to soften it and reduce root breakage. Grasp the foliage near the crown and pull gently straight up with steady pressure. If the carrot resists, carefully loosen the surrounding soil with a small trowel or fork, taking care not to spear the root.
For continuous harvest, practice succession harvesting by pulling every other carrot, allowing remaining carrots more space to size up slightly while still in the baby stage. This extends your harvest window and maximizes yield from limited space.
Post-Harvest Handling:
Remove foliage immediately after harvest by twisting or cutting it off 1/4 inch above the crown. Leaving foliage attached draws moisture from the root, causing rapid deterioration.
Gently brush off excess soil without washing. Unwashed baby carrots store better and longer. Place in perforated plastic bags or containers with damp paper towels and refrigerate immediately. Properly stored baby carrots remain crisp and flavorful for 2-3 weeks.
Flavor Enhancement:
For the sweetest carrots, allow plants to experience cool temperatures (50-60°F) for the final 1-2 weeks before harvest. This cold exposure triggers the plant to convert starches into sugars as a natural antifreeze, intensifying sweetness. Indoor growers can simulate this by moving containers to a cool room or reducing heating in the growing area.
Troubleshooting Common Issues
Forked or Twisted Roots: Caused by obstacles in the soil (rocks, clay lumps), too much nitrogen, or inconsistent moisture. Prevention is key—use properly prepared, fine-textured soil.
Bitter Flavor: Results from heat stress, inadequate water, or harvesting too late. Maintain cool temperatures and consistent moisture throughout growth.
Green Shoulders: Caused by sun exposure on the crown. Mound soil around the base of plants to cover exposed root tops.
Slow Germination: Normal for carrots, but ensure soil temperature remains 65-75°F and moisture stays consistent during the critical germination period.
Conclusion
Growing baby carrots indoors requires attention to detail but rewards you with tender, sweet vegetables that surpass store-bought options. By providing deep containers, friable soil, consistent moisture, adequate light, and cool temperatures, you’ll harvest impressive crops year-round. Start with small batches, learn your specific indoor environment, and soon you’ll enjoy the satisfaction of pulling perfectly formed baby carrots from your indoor garden.