Indoor gardening begins with three simple truths. Plants need light, warmth, and consistent care. If you can give them those three things, you can grow herbs successfully on any bright windowsill. This guide takes you through the entire process of starting an indoor herb garden from nothing — setting up your space, sowing your seeds, caring for the plants through their first month, and knowing what to expect each week. The goal is not just to keep herbs alive, but to grow them into healthy, productive plants you can harvest again and again.
Preparing Your Growing Space
Before you plant a seed, it’s important to understand what herbs need indoors. You’re recreating the essential conditions of the garden within four walls — the light of the sun, the moisture of the soil, and the air that keeps everything breathing.
Choose a bright window, ideally south- or west-facing, that receives at least six hours of sunlight each day. If your home doesn’t have a bright enough window, you can use a simple full-spectrum LED grow light. Position it about fifteen centimetres above where your plants will sit and run it for twelve to fourteen hours daily. The brightness should feel similar to a sunny day outdoors.
Temperature matters just as much as light. Herbs thrive in warmth that’s comfortable for people, between eighteen and twenty-four degrees Celsius. Keep your plants away from cold glass, draughty doors, or direct heat from radiators. Sudden changes in temperature cause stress that slows growth.
Air movement prevents problems. A short burst of fresh air from an open window, or the gentle hum of a small fan for half an hour, keeps the leaves dry and reduces the chance of mould or pests. Still air indoors is often the cause of weak stems or fungus gnats.
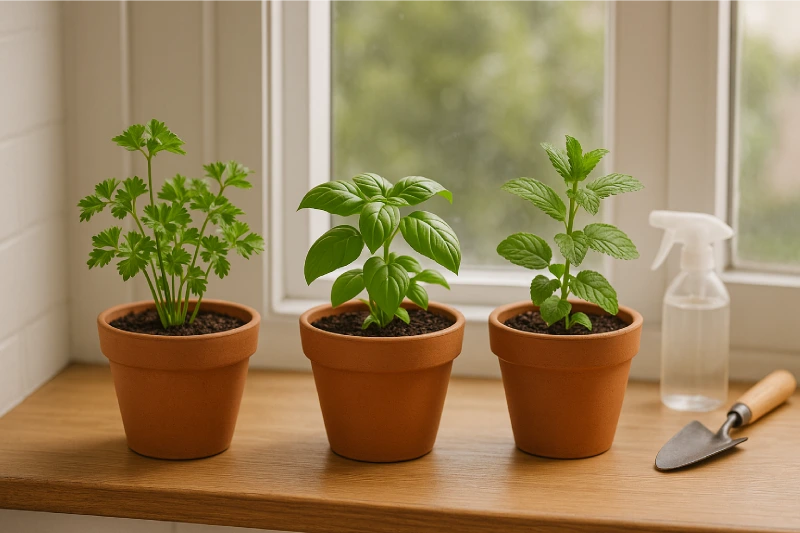
For pots, choose containers about twelve to fifteen centimetres wide with drainage holes in the bottom. Terracotta pots allow soil to breathe and dry evenly. Plastic or glazed ceramic pots hold moisture longer, which can be helpful in dry homes. Always wash your pots in warm soapy water, rinse them well, and let them dry before use. A saucer underneath will catch any excess water but should always be emptied after watering.
The soil mix is your foundation. Garden soil is too heavy for indoor pots and can introduce pests. Use a light, peat-free potting mix made for houseplants or herbs. You can improve drainage by mixing in a small handful of perlite or coarse sand. When you fill your pots, stop about two centimetres below the rim. That space prevents overflow when watering.
Use room-temperature water. Herbs dislike cold water on their roots. Water slowly until it runs freely from the bottom of the pot, then tip away what collects in the saucer. Touch the soil before each watering. If the top two centimetres feel dry, it’s time to water. If they still feel cool and damp, wait another day.
Once you have good light, the right pots, and a fresh compost mix, you’re ready to plant.
Growing Basil Indoors
Basil needs light and warmth more than anything. It grows quickly when conditions are right, and it’s a good teacher for beginners because it clearly shows what it likes and what it doesn’t.
To sow basil, fill a small pot about ten centimetres wide with moist compost and smooth the surface gently. Scatter a pinch of seeds evenly and cover them with about half a centimetre of compost. Mist the top lightly and place the pot somewhere warm — ideally around twenty-five degrees. A loose cover of clear plastic or a propagator lid helps retain warmth, but leave a small gap for air. Germination usually happens within seven to ten days.
When you see the first two small leaves, remove the cover and move the pot into bright light. Keep the soil barely moist but not soaked. Once the seedlings have two sets of true leaves, thin them to the strongest three or four plants by cutting the extras at the base. As the survivors reach ten to twelve centimetres tall, transplant them into a larger pot about fifteen centimetres wide. Firm the compost lightly around the roots and water well.
Basil needs six or more hours of bright light every day. On dull days, or if you use a grow lamp, keep the light fifteen centimetres above the plants. The leaves should be a rich green; if they turn pale or stretch toward the light, they need a bit more brightness.
Water basil when the top layer of soil feels dry to the touch. Pour slowly until water drips from the holes below. Empty the saucer so the pot never sits in water. Basil likes to dry slightly between waterings. Overwatering is the quickest way to weaken it.
Begin feeding after three weeks of steady growth. Use a balanced liquid fertiliser at half strength once every two weeks. Too much feeding makes the stems soft and the flavour dull. A steady, light routine keeps the plant strong and aromatic.
When the basil reaches fifteen centimetres tall, pinch out the growing tip just above a pair of leaves. This simple act turns one stem into two and keeps the plant compact. Continue to pinch new tops every time two sets of leaves appear. If flower buds form, remove them immediately — flowering signals the plant to stop growing leaves. Harvest regularly by cutting the top eight to ten centimetres of several stems rather than taking large sections from one. Always leave enough leaves for photosynthesis.
Expect basil to double in size in its first month if it has good light and warmth. Its scent will become stronger each week, and by the fourth week you’ll be able to pick enough for cooking.
Growing Parsley Indoors
Parsley is slower to start but easy to maintain once it’s established. It enjoys cooler conditions than basil and needs steady, even moisture.
To start parsley, soak the seeds overnight in warm water. This softens their outer shell and helps them germinate faster. Fill a twelve-centimetre pot with moist compost and scatter the seeds evenly across the surface. Cover with about a centimetre of compost and mist lightly. Keep the pot warm — around twenty degrees — and don’t let the soil dry out. Parsley takes time to sprout, often two to three weeks, so patience is essential. The key is to keep it evenly moist but not waterlogged during that wait.
When the seedlings appear, choose the strongest four or five and thin out the rest by cutting them at the base. Parsley doesn’t like being transplanted, so sow it directly into its final pot if you can. Place the pot where it will get bright but indirect light — a window with morning sun or gentle afternoon light is ideal. Parsley prefers temperatures between sixteen and twenty-two degrees.
Keep the soil evenly moist at all times. It should never be bone dry or soggy. A good habit is to water lightly when the top layer begins to feel dry, then check the weight of the pot. If it feels noticeably lighter than before, that’s another sign it’s time to water. Once a week, let the pot soak from below by filling the saucer with water for ten minutes, then pouring away the remainder. This draws moisture up through the roots evenly.
Feed parsley every three to four weeks with a diluted liquid fertiliser. Too much feeding leads to tall, weak stems. Parsley appreciates consistency more than richness.
When harvesting, always cut the outer stems near the base, leaving the inner ones to keep growing. The plant renews itself from the centre. If you harvest in rotation around the plant, it will continually produce new leaves for months. Avoid cutting more than half the foliage at once. Parsley remains productive for about five to six months indoors before it starts to weaken. At that point, sow a new pot so you always have a replacement coming along.
The most common problems with parsley are yellowing leaves from irregular watering or powdery mildew from poor air circulation. Keeping the plant evenly moist and ensuring good airflow prevents both.
Growing Mint Indoors
Mint is forgiving, fast, and adaptable. It thrives in conditions that would defeat most herbs, which makes it perfect for beginners. The main rule with mint is to give it its own pot. It spreads rapidly and will overrun any neighbour.
The easiest way to grow mint indoors is from a cutting. Take a ten-centimetre length of healthy stem, remove the leaves from the lower half, and place it in a glass of water on a bright windowsill out of direct sun. Within a week you’ll see roots forming. Once they reach two or three centimetres long, plant the cutting into a fifteen-centimetre pot filled with moist compost. Firm it gently and water well. For the first few days keep it in indirect light until the roots take hold.
Mint prefers bright but gentle light — about four to six hours daily. It will grow happily in a north-facing window as long as the room is bright. The ideal temperature range is sixteen to twenty-two degrees, though it tolerates cooler air if kept out of drafts.
Mint likes steady moisture. Check the soil every day and water when the top centimetre feels dry. Always empty the saucer after watering so the roots don’t sit in water. In hot, dry homes, mist the leaves occasionally to keep humidity up. Mint recovers quickly from wilting if watered promptly but will rot if left in soggy soil.
Feed once a month with half-strength fertiliser. Heavy feeding encourages coarse leaves with weaker flavour, so less is more.
Prune mint regularly. When stems reach about fifteen centimetres tall, cut them just above a pair of leaves. This encourages side shoots and keeps the plant bushy. Harvest whole stems rather than single leaves, taking no more than one-third of the plant at once. If flowers appear, remove them as soon as you notice; flowering slows leaf production. Every few months, refresh the plant by trimming away some of the older roots and replanting in fresh compost. This keeps it vigorous indefinitely.
If you see orange spots on leaves, that’s mint rust — remove affected parts immediately and increase airflow. Pale leaves usually mean too little light or overwatering. With minor adjustments, mint quickly recovers
The First 30 Days
When you begin growing herbs indoors, the first thirty days are about observation and gentle adjustment. You’re building a rhythm — water, warmth, light, air — and learning how each herb responds. This day-by-day guide walks you through exactly what to do, what you’ll see, and what to expect as your basil, parsley, and mint establish themselves.
Day 1: Setting the Foundation
Choose a bright spot with at least six hours of light each day. A south- or west-facing window is perfect. Clean your three pots (one for each herb) with warm soapy water, rinse, and dry. Fill them with a peat-free indoor potting mix mixed with a little perlite for drainage.
Plant your basil seeds about half a centimetre deep in moist compost. Cover lightly and mist the top.
Soak your parsley seeds in warm water overnight before sowing tomorrow.
Take a mint cutting about ten centimetres long, remove the lower leaves, and place it in a glass of clean water. Set it in bright but indirect light.
Check that the pots are damp but not dripping, and that your mint cutting isn’t in direct sunlight.
Day 2: Settling In
The basil pot should remain moist. If the surface looks pale and dry, mist lightly — don’t water heavily yet. Keep the pot warm, ideally between twenty and twenty-five degrees Celsius. Covering loosely with clear plastic will hold humidity.
Sow your parsley today: scatter the soaked seeds over moist compost, cover with about a centimetre of soil, and mist gently. Label it.
The mint cutting will still be in water. Replace the water with fresh, room-temperature water. You may not see roots yet, but the stem is absorbing moisture.
Day 3: Checking Conditions
Nothing will be visible yet in either pot, and that’s normal. Beneath the surface, basil seeds are swelling and preparing to germinate. Keep the basil pot evenly moist and warm.
Parsley needs patience — it’s resting before it wakes up. Keep the soil slightly shiny with moisture but never soaked.
Change the mint water again and make sure the leaves above the rim of the glass stay dry. The cutting should still look firm and green.
Day 4: Maintaining Warmth and Moisture
Continue to monitor moisture. For basil, the surface should look dark but not glistening wet. Lightly mist if it starts to crust over.
Parsley remains unchanged on the surface. Resist the urge to water too often. A gentle mist each morning is enough.
The mint stem should now look fresher and slightly thicker near the cut end — that’s a sign roots are beginning to form. Replace the water again and keep the glass clean.
Day 5: The First Sprouts (Basil)
Tiny green loops will start to appear in the basil pot. These are the first seedlings pushing up. Move the pot into bright light immediately but not direct hot sun. Remove any cover so air can circulate.
Keep the compost evenly moist but never heavy. A teaspoon of water gently poured near the seedlings works well.
Parsley will still be sleeping. Keep watching for darkening soil colour — that’s your signal it’s moist enough.
Mint remains in water; change it again. You may begin to see the faint start of roots.
Day 6: Supporting Early Growth
Basil seedlings will straighten and open their small oval leaves. Turn the pot slightly each day so they grow upright. Avoid watering from above — use a gentle pour at the edge or a small syringe or bottle to avoid disturbing roots.
Keep parsley warm and moist. Nothing visible yet.
Mint roots should now be about half a centimetre long. Keep the water fresh and clear.
Day 7: Light and Patience
Basil is growing quickly. Make sure it receives six hours of light. If daylight fades early, use a small LED grow light to extend brightness. Keep it about fifteen centimetres above the plants.
Parsley still quiet. Continue the same care.
Mint should now have roots around a centimetre long. They’ll look thin and white. Replace the water again and prepare a fifteen-centimetre pot with moist compost for transplanting soon.
Day 8: Transplanting Mint
Plant the rooted mint cutting into its pot. Fill with moist compost, make a small hole, and tuck the roots in gently. Firm the soil lightly and water enough to settle it. Keep in bright but indirect light for the next few days while roots adjust.
For basil, continue daily turning and moisture checks. If seedlings start crowding each other, thin them by snipping the weaker ones at the base.
Parsley may show tiny green shoots now if it’s been warm and moist. Don’t touch them; they’re fragile. Just keep the surface lightly damp.
Day 9: Observing Early Differences
The three herbs will now begin to develop their individual rhythms. Basil will look noticeably larger; mint will seem to rest for a day or two after planting; parsley will just be waking.
Your main task is consistency. Check soil moisture each morning. Basil usually needs a light watering every other day. Mint may need a little more often because it’s establishing new roots. Parsley should stay evenly moist but not waterlogged.
Day 10: Building Strength
Basil’s first true leaves will appear above the tiny rounded seed leaves. That’s your sign it’s doing well. Keep light steady and temperature around twenty to twenty-four degrees.
Parsley will now have slender, grass-like shoots. Continue keeping the compost just moist.
Mint will start to perk up and show new growth at the tips. If the top leaves are curling or pale, move the pot a little closer to the window but avoid midday sun.
Day 11: Morning Checks
Each morning, run a finger across the soil of each pot. You’ll feel which ones are dry. Basil often dries faster because of light intensity. Water it lightly, let excess drain, and empty the saucer.
Mint should have firm, upright stems. If leaves droop by evening, that’s a hint it needs slightly more water or gentler light.
Parsley may still be delicate but steady. The tiny sprouts should now stand upright.
Day 12: Air and Space
As basil leaves spread, make sure they have breathing space. If too crowded, remove one or two seedlings. This helps air move between them and prevents damping-off disease.
Mint may send up new shoots from the base — that’s a good sign the roots are taking hold.
Parsley’s growth will seem slow compared to the others, but resist impatience. It’s building roots.
Day 13: Feeding the Soil Gently
If basil looks healthy and steady, prepare to start feeding soon. Not yet, but in a few days. For now, water normally and keep light bright.
Parsley and mint don’t need feeding yet; they’re still settling.
Keep the room ventilated for a few minutes after watering to prevent excess humidity.
Day 14: Two Weeks In
You now have a small indoor garden taking shape. Basil should be about seven to eight centimetres tall with a few pairs of leaves. Mint is sturdy, with several stems. Parsley has its first proper leaves beyond the thread-like sprouts.
Keep every pot moist but not soaked. Touching the soil remains the best guide. Basil and mint may now need watering almost daily in warm rooms.
Rotate each pot slightly for even light.
Day 15: Early Maintenance
Check the underside of leaves for pests — unlikely this early, but good habit-building. Clean any dust from the window to maximise light.
Basil can now handle its first very light feeding: a quarter-strength liquid fertiliser poured gently around the base, never on the leaves.
Parsley still needs patience and steady watering. Mint continues happily; if it’s producing longer stems, pinch the tip off one or two to encourage branching.
Day 16: Watching for Signals
Every plant gives clues. Basil leaves pointing upwards mean it’s happy; drooping or cupping downward means it’s thirsty. Parsley leaves twisting may signal it’s too dry or too warm. Mint’s leaves becoming pale could mean it needs more light.
Adjust only one thing at a time: light before feeding, watering before moving.
Day 17: Adjusting Light
Rotate all pots again. If basil leans heavily toward the window, that’s normal but shows it wants more balanced light.
Mint enjoys bright but indirect light, so if its leaves start curling, move it a little back from the glass.
Parsley’s small shoots now begin forming their distinctive leaf shape. Keep the temperature stable.
Day 18: Strength and Shape
Basil now looks bushier. Pinch off the very top of the tallest stem just above a leaf pair. This encourages branching. You’ll see two new shoots forming in a few days.
Parsley’s growth rate will pick up slightly. Continue watering whenever the top feels dry.
Mint may need its first proper drink — water thoroughly until it drains, then empty the saucer.
Day 19: Tidying and Observation
Check soil surfaces for any green algae or mould. If present, it means overwatering or poor airflow. Loosen the top layer gently with a fork and allow to dry slightly.
All three pots should now smell faintly herbal when you touch the leaves — a good sign of healthy oils developing.
Day 20: Encouraging Vigour
Feed basil again at half-strength this time if it’s growing steadily. Parsley and mint don’t need fertiliser yet.
Mint’s side shoots will start branching out. If any stems grow long and thin, cut them back to just above a pair of leaves. The plant will thicken naturally.
Day 21: End of Week Three
By now, basil is about twelve to fifteen centimetres tall and quite full. Parsley has several distinct leaf stems. Mint is lush and beginning to fill its pot.
Water all as needed and rotate for even light. Harvesting can begin lightly soon.
Day 22: Small Harvests
You can now take your first few basil leaves. Snip the topmost pair from the tallest stems, leaving enough foliage behind. This not only gives you fresh herbs but keeps growth compact.
Mint can also spare a few sprigs. Cut just above a leaf node to encourage regrowth.
Parsley should still be left alone for another week to strengthen.
Day 23: Assess and Adjust
Check each pot’s weight before watering. Basil dries fastest, parsley holds moisture longer, mint varies by temperature. Learn their rhythm by lifting and feeling. This skill matters more than any schedule.
If any leaves yellow, remove them promptly.
Day 24: Building Routine
At this point, the daily routine becomes second nature: morning light check, moisture check, rotation, and evening observation. Herbs thrive on consistency.
Keep temperature stable, and open the window for fresh air when possible.
Day 25: Feeding Time
Give basil and mint a light feed if growth is steady. Parsley can have its first very gentle feed now too, but half the strength of the others. Feeding too early or too much causes soft growth.
Day 26: Leaf Care
Dust may begin settling on the leaves, especially basil. Wipe gently with a soft, damp cloth to keep them clean. Dust blocks light absorption and slows growth.
Ensure no standing water remains in saucers overnight.
Day 27: Encouraging New Growth
Basil should now have several strong stems. Pinch out another tip or two to promote branching. Each pinch doubles the number of growing points.
Mint can be trimmed lightly to maintain shape. Parsley is now harvestable — cut one or two outer stems at the base.
Day 28: Refresh and Observe
Gently scrape and replace the top centimetre of compost in each pot with fresh mix. This refreshes nutrients and improves airflow around the base.
Check that no roots are circling the surface — if so, you’ll repot next month.
Day 29: Evening Check-In
By now you’ll know your plants individually — how fast they drink, which ones reach for light, which bounce back quickest after watering. This awareness is the essence of good gardening.
Observe each plant quietly. Basil should smell rich and sweet, parsley earthy, mint bright and clean.
Day 30: First Month Completed
When you begin growing herbs indoors, the first thirty days are about observation and gentle adjustment. You’re building a rhythm — water, warmth, light, air — and learning how each herb responds. This day-by-day guide walks you through exactly what to do, what you’ll see, and what to expect as your basil, parsley, and mint establish themselves.
From here, continue your rhythm: check, water, rotate, feed, and harvest lightly each week. Refresh soil every few months, and sow new parsley when the old plant begins to slow.
After thirty days, you haven’t just grown herbs — you’ve learned the pattern of growth itself: light above, moisture below, air all around, and patience everywhere in between.
That rhythm will guide every plant you grow from now on.
Herb Troubleshooting Guide
| Issue | What You’ll Notice | Likely Cause | How to Fix It |
|---|---|---|---|
| Basil leaves turning yellow from the base | Lower leaves fade to pale yellow while upper ones look fine. | Overwatering and poor drainage; roots are sitting in soggy soil. | Let the top 2–3 cm of compost dry before watering again. Empty saucers after 10 minutes. Loosen the soil surface to help it breathe. |
| Basil stems blackening at soil level | Soft, dark stems that collapse easily. | Cold temperatures below 18°C or constant wetness. | Move to a warmer, brighter spot. Water less often, allowing soil to dry slightly between waterings. |
| Basil growing tall and spindly | Long stems with wide gaps between leaves. | Insufficient light or grow light positioned too far away. | Move closer to a bright window or lower the lamp to 15 cm above the leaves. Rotate the pot every few days. |
| Basil leaves curling or cupping | Edges roll under, sometimes turning leathery. | Heat stress or low humidity. | Move slightly back from the window glass and mist lightly in the morning. Avoid direct midday sun. |
| Parsley leaves turning yellow all over | Whole plant pale and weak. | Lack of nutrients or light. | Feed with half-strength liquid fertiliser and move to brighter conditions. Remove oldest yellow leaves. |
| Parsley wilting even when soil is wet | Stems flop despite moist compost. | Poor drainage or root rot beginning. | Let the soil dry until just barely damp. Check drainage holes. Re-pot if needed in fresh, lighter mix. |
| Parsley germination slow or patchy | Sparse seedlings after three weeks. | Seed coat too hard or uneven moisture during germination. | Soak seeds for 12–24 hours before sowing. Keep soil evenly damp, never dry or soaked. Germination can take up to 30 days. |
| Powdery mildew on parsley | White powdery coating on leaves. | Stagnant air and humidity. | Increase airflow with a small fan. Remove affected leaves and water at soil level, not on foliage. |
| Mint leaves yellowing | Lower leaves fade, some fall off. | Waterlogging or lack of drainage. | Allow soil to dry slightly before watering again. Make sure the pot drains freely. |
| Mint rust | Small orange or brown spots underneath leaves. | Fungal infection from overcrowding or humidity. | Remove and discard infected leaves. Improve airflow, avoid overhead watering, and refresh topsoil. |
| Mint losing flavour | Leaves look healthy but taste mild or grassy. | Too much fertiliser or too little light. | Reduce feeding to monthly half-strength and move to brighter light. Trim regularly to encourage new growth. |
| Mint stems woody and tangled | Thick roots and tired, coarse leaves. | Old root ball and lack of renewal. | Remove from pot, slice off bottom third of roots, add fresh compost, and replant. Refresh every 3 months. |
| Seedlings collapsing suddenly (“damping off”) | Young stems fall over at the base. | Fungal disease from overwatering or stale air. | Improve ventilation, water less often, and sprinkle a little dry compost or sand on the surface. Always use clean pots and tools. |
| Small black flies around soil | Tiny gnats hovering near pots. | Fungus gnats breeding in wet soil. | Let topsoil dry before watering again. Add a thin layer of coarse sand or perlite to the surface. Keep air moving gently. |
| Leaves covered in sticky residue or tiny insects | Glossy or sticky leaves with clusters of green or black bugs. | Aphids feeding on sap. | Rinse under a gentle tap or wipe leaves with a damp cloth. Avoid overfeeding with nitrogen-rich fertiliser. |
| Brown, dry leaf edges | Tips crisp or brown while rest of leaf stays green. | Low humidity or too much fertiliser. | Mist the air lightly in mornings. Flush soil once with plain water, then resume feeding at half strength. |
| No aroma or weak scent from herbs | Plants look fine but smell faint. | Lack of light or too much nitrogen. | Give at least 6 hours of bright light daily and reduce fertiliser frequency. Pinch often to stimulate new growth. |