If you grow indoors for long enough, you realise soil makes or breaks everything. I used to think compost was just compost — scoop it into a pot, drop in a seed, water, and wait. But after a few wilted herbs, slow-growing lettuces, and tomato plants that refused to flower, I learned the truth: most of the problems people blame on light or watering actually start in the soil. Once I got that right, everything else fell into place.
Why indoor soil is different
Outdoor soil has help. Rain washes through it, worms keep it airy, and temperature shifts dry it out naturally. Indoors, you don’t get any of that. You’ve got limited airflow, no drainage beyond what you build into the pot, and moisture that either vanishes too quickly or lingers too long. That’s why garden soil straight from the ground never works inside — it’s too heavy, clogs easily, and quickly compacts into something that smothers roots.
Indoor gardening is about control. You want soil that’s light enough to breathe, stable enough to hold moisture, and clean enough not to carry pests or diseases. When you tip a handful into your palm, it should crumble lightly, not stick together like wet clay. That texture is what keeps roots healthy — and healthy roots are what make plants grow strong, flavourful leaves and fruit.
What plants really need from soil
Every plant in my kitchen wants four basic things from its compost: air, water, nutrients, and support. Get those in balance and you can grow almost anything.
Air: Roots need oxygen as much as leaves need light. Dense or waterlogged soil shuts them off and they start to rot. That’s why lightness matters — air pockets are life inside a pot.
Water: The trick isn’t keeping soil wet; it’s keeping it evenly moist. A good indoor mix absorbs water evenly and releases it slowly. When I water, I look for that moment when the surface glistens but isn’t flooded. The pot should feel heavy, but not soggy.
Nutrients: Compost provides the basics — nitrogen for growth, phosphorus for roots, potassium for flowers and fruit — but these deplete faster indoors because we water more often. That’s why a rich but well-balanced base compost is essential. You can always top up nutrients later, but if the structure’s wrong, no amount of feeding will save the plant.
Support: The soil holds everything upright. Light compost might seem ideal, but if it’s too fluffy, tall plants like tomatoes or chillies will lean or topple. The best mixes strike that middle ground — open but firm, moisture-holding but never claggy.
Building the perfect indoor mix
I use a simple formula that works for nearly everything in my windowsill garden — herbs, salad greens, small vegetables, even dwarf fruiting plants. Think of it as a flexible starting point you can tweak for each crop.
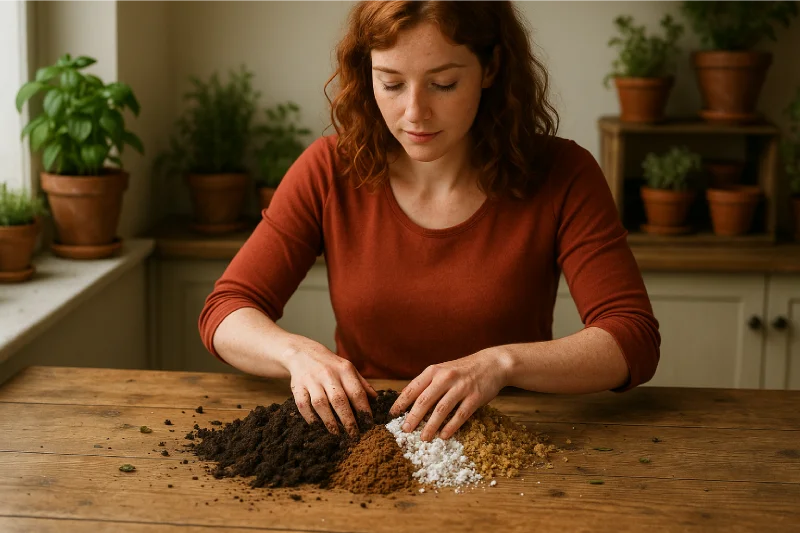
Polly’s base mix:
- 60% quality peat-free multipurpose compost
- 20% perlite or vermiculite
- 10% coco coir (rehydrated if it comes in blocks)
- 10% well-rotted organic matter — worm castings if I have them, or homemade compost that’s broken down completely
The peat-free compost gives structure and nutrients. The perlite or vermiculite adds air and prevents compaction. Coir improves moisture balance — it holds water evenly but drains well. The organic matter feeds microbes and gives plants that slow, steady nutrition that keeps them lush.
I blend it by hand in a bucket until the texture feels right: light, crumbly, and just damp enough to hold shape when squeezed. If it sticks together or oozes, it’s too wet. If it falls apart like dust, add more coir or compost.
Why I avoid garden soil and cheap compost
It’s tempting to scoop soil from the garden, but it’s full of fine particles, larvae, and bacteria that can thrive in the still air of an indoor pot. It also packs tight when watered repeatedly. Indoors, you want clean, sterile, and free-draining soil.
The same goes for cheap compost bags that feel heavy and smell sour. They’re usually made from low-grade waste wood or green matter that hasn’t decomposed properly. When I opened one once, the texture was sticky and uneven — my basil seedlings never stood a chance. Spend a little more for a reputable brand or mix your own from clean ingredients; the difference is night and day.
Adjusting soil mixes for different crops
No single mix suits everything. Once you know the base structure, you can adapt it easily for what you’re growing.
For herbs:
Herbs prefer drier, lighter soil. Basil and parsley like steady moisture, but mint and thyme hate sitting in damp compost. I use my base mix but increase the perlite to 30% and reduce coir slightly. This keeps the soil quick-draining, so I can water generously and let it dry properly between rounds.
For leafy vegetables:
Lettuce, spinach, and rocket need more water to stay tender. I add extra coir and a little less perlite — roughly 15% perlite, 20% coir. It keeps the compost evenly moist, especially in warm kitchens where pots dry fast. I also mix in a spoonful of worm castings or composted manure for a slow feed.
For root crops:
Radishes and spring onions need loose soil to grow straight, clean roots. I sieve my mix lightly to remove any clumps, add fine sand (about 10%), and keep perlite moderate. This gives them the space to swell without resistance. Hard-packed compost makes radishes grow crooked or split.
For fruiting vegetables:
Tomatoes, chillies, and peas are hungrier than herbs or lettuce. They need more organic matter to fuel flowering and fruiting. I enrich the base mix with extra compost and a tablespoon of bone meal or organic tomato fertiliser. They like consistency — not too dry, not too soggy — so I sometimes add a layer of bark chips or coconut husk on top to slow evaporation.
Buying compost versus mixing your own
If you’re new or just want something ready-made, look for bags labelled peat-free multipurpose compost with added perlite or indoor potting mix. Avoid anything marked topsoil — that’s too heavy.
Store-bought composts vary widely. Open the bag and check: good compost feels springy and slightly moist, not slimy or dusty. You should see a mix of fine and fibrous particles, not clumps or solid wood chunks.
Over time, though, you’ll find mixing your own gives you more control. You can tweak moisture levels to suit your home. A dry flat near radiators needs more coir. A cool north-facing room might benefit from less. I batch-mix about 10 litres at a time and store it in a lidded tub in the cupboard under the stairs.
Feeding: when the soil’s job ends and yours begins
Compost feeds plants for roughly six weeks. After that, the nutrients start to run low. I top up with liquid seaweed feed or tomato fertiliser, diluted to half strength, every 10–14 days. For slower-growing herbs, I stretch it to three weeks.
You can tell when soil’s gone tired: leaves pale even though watering’s regular, and growth stalls. A gentle feed perks them up again. Just avoid overfeeding — if you see a crust of white salts on the soil surface, it’s time to flush with clean water to reset the balance.
Reusing and refreshing old soil
I reuse compost when I can, but only if the plant that lived in it was healthy. I shake out the roots, break up clumps, and mix in fresh compost (about one-third new to two-thirds old). I also add a handful of perlite or grit to open it up again.
If the soil smells sour, feels greasy, or has fungus gnats, I throw it out. There’s no point saving £1 of compost only to lose £3 worth of seeds and weeks of time. Healthy soil smells clean and earthy, not stale.
Between crops, I keep spare soil in a bucket with a lid or a fabric grow bag. Stored properly, it keeps fine for months.
Dealing with common soil problems
Compacted soil:
You water and it pools on the surface instead of soaking in. Break up the top few centimetres gently with a fork, then add perlite next time you replant.
Waterlogging:
The compost stays wet days after watering. Check drainage holes first. If they’re clear, reduce coir or add more perlite to the next mix. Always use a saucer and empty standing water after ten minutes.
Fungus gnats:
Tiny flies buzzing around the soil mean it’s staying too damp. Let the top inch dry out completely before watering again. A sprinkle of sand or fine grit on the surface helps deter them.
Nutrient depletion:
Plants stop thriving even though watering’s right. Feed regularly, or repot into a mix with fresh compost and organic matter.
Mould on the surface:
White fluff on top isn’t deadly, but it means poor air circulation or too much moisture. Scrape it off and ease up on watering for a week.
The role of microbes and organic matter
Even though we call it soil, indoor compost isn’t truly alive like garden soil. It lacks the worms and full microbial networks that keep outdoor beds self-sustaining. That’s why adding small amounts of organic matter — worm castings, leaf mould, or composted manure — makes such a difference. It reintroduces beneficial microbes that help roots absorb nutrients.
If you can’t get worm castings, make a mild compost tea. A handful of compost in a muslin bag soaked overnight in a bucket of water creates a nutrient solution you can use to water plants once a month. It’s an easy way to keep soil life ticking along indoors.
Sourcing sustainable materials
I choose peat-free compost because peat extraction destroys natural habitats and releases carbon that took centuries to store. The good news is modern alternatives like coir, bark, and green compost have improved hugely. You just need to pay attention to how they behave — coir holds water, bark adds structure, green waste provides nutrients.
If you’re mixing at home, aim for ingredients labelled “certified peat-free” or from suppliers who state their renewable sources clearly. Most big garden centres now stock reliable options, and smaller UK producers are even better — you’ll often find them at farmers’ markets or online.
How soil interacts with containers
Different pots change how the same soil behaves. Terracotta dries faster, glazed pots slower. Plastic holds moisture longer. That’s why the same mix might need watering every other day in one pot and twice a week in another. You can read more about this in How to Choose Containers for Indoor Gardening, but the key rule is: adjust watering, not the mix. Once you know how your containers behave, your soil mix can stay consistent.
Storing ingredients and mixed compost
I keep coir bricks, perlite, and compost in sealed tubs in the shed. If you store them indoors, make sure they’re dry and away from direct heat. Mixed soil should stay slightly damp — not bone dry — so microbes stay alive. I stir stored compost once a month to keep it airy.
When to change everything
After a year or two, even the best mix wears out. The fine particles break down, and drainage slows. At that point, I empty the pot, sift out roots, and rebuild the mix with fresh compost and perlite. I keep the old soil for topping outdoor planters or spreading around shrubs — never wasted, just recycled elsewhere.
A word on convenience
There are ready-made indoor mixes and hydroponic growing kits that handle light and moisture automatically. They’re great for people short on time or space. I use traditional compost because I enjoy the process — but there’s no right or wrong. The best system is the one you’ll actually use. A good mix in any setup is what makes the difference between limp herbs and the kind that keep growing back.
Final thoughts
Soil doesn’t get much attention, but it’s what decides whether your indoor garden thrives or struggles. Once you learn how to build and care for a good mix, everything else — watering, feeding, even pest control — becomes easier. You don’t need anything fancy, just a few clean ingredients and the habit of paying attention.
The more you handle soil, the more you learn by touch. Dry soil feels lifeless; good soil feels alive, springy, ready. Every time I repot something, I’m reminded that healthy roots are invisible until they aren’t — until you see new growth and know you got it right. Soon you’ll find yourself growing food all year round.
If you’ve already read How To Start An Indoor Garden From Scratch, you’ll know containers and light matter too — but soil is where it all begins. Get this part right, and everything else follows naturally.